
Setting Up Your Cordless Business Phone Featuring the Yealink W60P
This business phone is sleek and reliable, It’s our new favorite cordless business phone
We have introduced a new piece of hardware to our line of digital business phones. This phone features high security, low power consumption and scalability to help your business grow. Features of this phone allow for typical phone usage such as making and answering phone calls, redialing, muting, and call holding. But also has more advanced features such as custom forwarding, attended transfers, local and network conferencing, targeted do not disturb, anonymous call rejection, multicast paging, and more.
If you have recently purchased this cordless phone from us, congratulations. This is an amazing piece of equipment. We want to make sure you are getting the most out of your purchase. Please review the following instructions on how to set up your new phone.
Setting Up Your New Cordless Business Phone is Easy
Connect the Base Station
Use the included DC power supply adapter to connect to the DC5V port located in the back of the base station.
Next, use the supplied ethernet cable to connect your base to your network via switch or hub device port. Your network should be set up and ready to accept these new business phones at the time they are shipped to you.
If in-line power is available via ethernet cable (PoE), you will not need to connect the AC adapter.

Set Up Your Phone’s Handset
Before you can use the handset, be sure to open the phone’s battery cover and insert the supplied battery. Avoid dropping the battery during this step as damaged batteries can compromise the life of the battery. To prevent drops, conduct this step of the process on a table or flat surface.
Set up the Charging Station
Use the supplied USB plug and connect the charger cradle to the 5V port plug using the attached USB cable on the charging cradle. You can now place your handset to charge. A full charge will take approximately 3 hours.
Check the LED Indicator Lights
After turning on your base station allow a few moments for the telephone to register with the base. You will see the first LED indicator light on the base illuminate a solid green when the phone has successfully registered. A flashing green light will notify you if the phone is in registration mode or if you are currently paging the handset.
A lost handset can be found by hitting the Paging button on the top of the base. The second LED light notifies you of the network status. A slow flashing green light means your network is offline. A solid green light means your network is available. The third LED light illuminates a solid green when the base station is powered on. A slow flashing green indicates the phone is upgrading its firmware.
Review Your Phone’s Main Menu
Pressing the OK key allows you to access the phone’s main menu (as seen in featured image above). Your default administrator password is “0000”. Your menu allows you to choose from seven items including: status, intercom, voice mail, call features, directory, settings, and history. Use your navigation keys to select one of the menu selections. You will then be presented with a list of menu items for each selection. To exit press the “End Call” button for several seconds to return to the home screen.
Manually Add Contacts
You can add contacts to your business phone manually or from your call history. To do so, enter OK and select Directory. Using your soft key press Options and then New Contact. After entering the contact information remember to press Save to record your edits.

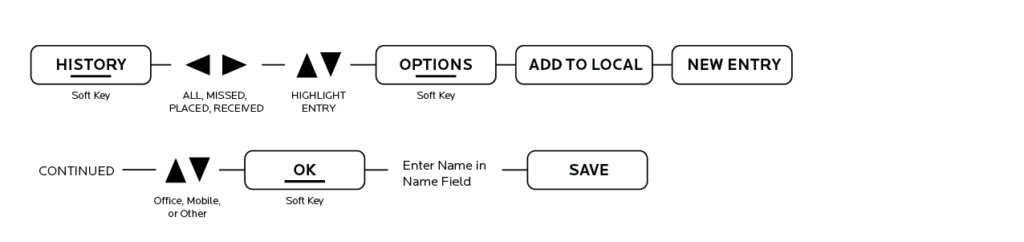
To add a contact from your call history press the soft key History when the phone is idle on the home screen. Using your directional keys select from Missed Calls, All Calls, Placed Calls, and Received Calls. Highlight your desired entry and press the soft key to select Add to Local and finally New Entry. Use your up/down directional buttons to select the type of phone (mobile, office, other) and press Ok. Enter a Name in the name field and press Save. To search for contacts press the middle Ok button and navigate to your Directory, enter the first few characters of the person’s name or number to see the contacts that match your search.
Blacklist Contacts
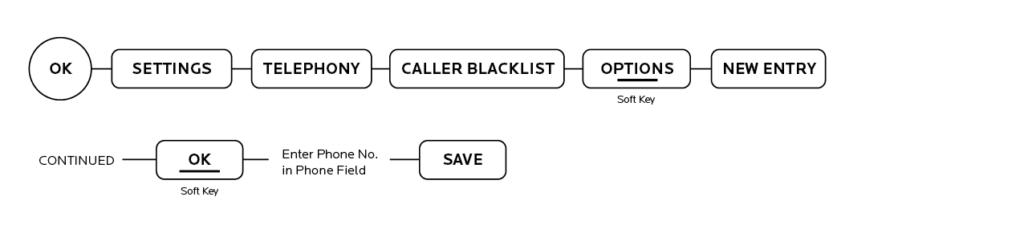
Tired of the cold calls, your new phone can store up to 30 blacklisted phone numbers. Press Ok to enter the main menu, press Settings and navigate to Telephony and finally Caller Blacklist. Press Options and select New Entry and press Ok. Now enter the phone number and press Save.
Assign Speed Dial Contacts
Enter your main menu and select Settings, followed by Telephony, and followed by Speed Dial. Use your directional buttons to select desired key and press the Assign key. Use the directional keys to assign a directory and press Enter. Edit your selection by entering the menu selection again and pressing the Options soft key and select Change. When the phone is idle, press any key 2-9 for an extended period of time. The phone number associated with this key will be dialed.

Set up Do Not Disturb
Activate this feature for specific lines. Enter the main menu and select Call Features and Do Not Disturb. Highlight the desired line and press the OK key. Use your directional arrows to select Enabled from the Status field and hit Save. This feature only takes effect on incoming lines assigned to the handset. The handset will reject all incoming calls and the LCD screen will display the missed call icon.

Call Forwarding
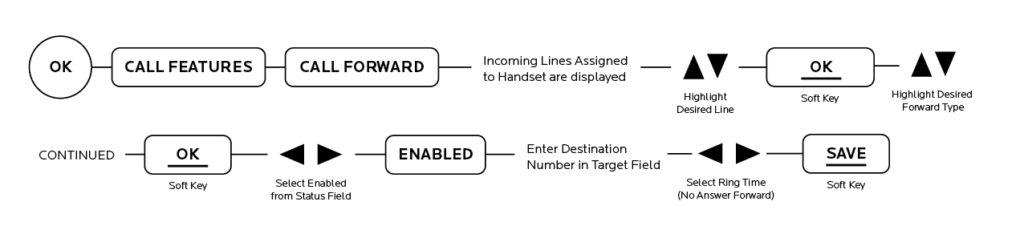
You have three forwarding types: Always Forward, Busy Forward, No Answer Forward. To set up your forwarding enter your main menu and select Call Features and Call Forward. You will now see the incoming lines assigned to the handset. Use your directional arrows and highlight the line you want forwarded and hit Ok. Now highlight the type of forwarding and once again hit Ok. Now using your left and right directional arrows to select Enabled from the Status field. Now enter the phone number you want to forward the incoming call in the Target field. If you are using the No Answer Forward, you can adjust the number of rings to wait before forwarding the call using the After Ring Time field. Press Save to record your changes.
Call Transfer
Three kinds of transfers exist including Blind Transfer, Semi-Attended Transfer, and Attended Transfer. You can also transfer a call between parties on a call.
Blind Transfer: To transfer a call directly to another person without talking to the caller
During a call press on the Options key and then select Transfer. Now enter the number or select a phone number you wish to transfer the call to. Now press the Transfer key.

Semi-Attended Transfer: Transfer a call after you get a ring-back
During a call press the Options key and then select Transfer. You can either enter a number, or select from your Directory. Perform your Semi-Attended Transfer by pressing the Call (green) button, Followed by the Speaker icon and then hit Ok. Now press Transfer to complete the transfer.

Attended Transfer: Transfer after speaking with caller
To perform an Attended Transfer, press the Options Key and select Transfer. Now you can either enter the number or enter your Directory to select a contact. Now press the Transfer key.

Transfer Between Parties: Transfer when there are multiple callers on a handset
Place a call and then add another caller. Select one of the calls and press Options and then Call Transfer. You will see the second caller you will transfer the call to. Press Transfer.
Conference Call
Create a local conference call between yourself and another two parties. Conference between active and held calls.
Local Conference with two external parties:
Place a call and press Options, then select Conference. Now you can either enter a phone number or search your Directory to find a desired contact. Press the Call (green) key, followed by the Speaker icon and then Ok. After the next party answers the call, press Conf. key to join the two calls.

Network Conference:
To conduct a conference with more than two parties, take advantage of Network Conference. Configure your conference features using the web user interface. You can also use the handset by first placing a call, pressing Options and then selecting Conference. You can either enter a number or search your Directory to find your desired contact. Now enter the Call (green) button, followed by the Speaker icon, and then Ok. After the party answers, hit the Conf. key to complete the conference. Now repeat these steps to add more parties.

We hope these basic setup instructions can help you get up and running with your new phone. Be sure to review your user manual for more in-depth information on setting up advanced features on your new Yealink W60P business phone not covered here. If you are a current customer and are having trouble setting up your phone, please reach out to sales@ztelco.com.

